
Proficiency Badge - First Aider
- Aidyn Harris

- Dec 31, 2021
- 5 min read
Updated: Feb 8, 2022

In December 2021, I joined the cub scouts from the Keat Hong Tiger Scout group for a First Aid course at Singapore Emergency Responder Academy.
I am very thankful for the opportunity to attend a physical First Aid course as it has been quite difficult to learn first aid online.
Prior to this session, I had watch First Aid videos and read about the importance of First Aid. I would like to thank the Keat Hong Tiger Scout Group for allowing me this opportunity to learn together and make new cub scout friends.
It is important to have a First Aid kit at home, at school and even on hiking trips. We learned how to pack a standard First Aid kit and I used this newly learned skill to check the first aid kit I have at home and also to pack an on the go first aid kit for my cycling and family hiking trip.
Task 1 : How to pack a standard 1st Aid Kit
These are the items you should have packed in a standard first aid kit.
1. Non-latex gloves: To protect ourselves from infection that can be transmitted via blood and body fluids.
2. Thermometer: To measure body temperature.
3. Surgical Scissors: To cut dressings and tapes
4. Shears: To cut clothing or bulky dressings.
5. Crepe Bandages: To give support to injured joints, secure and maintain pressure on wounds and dressings.
6. Large and Medium pads: To aid in pressure dressing for large cuts.
7. Gauze Pad: To clean and cover wounds.
8. Adhesive plasters: To cover superficial wounds.
9. Triangular Bandages: To immobilise fractures & act as secondary dressing.
10. Adhesive Tapes: To tape ends of dressings & bandages.
11. Burn Kit/Gel: To aid, cool and relieve pain in burn incidents.

Task 2: Know the limits of first aid and when a first-aider would need to get adult help.
We also learned the importance to know when to get adult help. We should try to get attention by shouting “Help Me! Help Me” to attract attention and call the 995 for help.
We learn the word DRAB which stands for Danger, Response, Airway and Breathing.
Danger – Check to make sure it is safe to approach the injured person. Look around are there any hazards such as electrical wires, damaged structures, moving vehicles, or falling objects? If the surroundings are dangerous, get help right away before trying to assist.
Response - Talk to the injured person. Do they answer questions? Do they appear to be awake or unconscious? The emergency operator will need to know how they respond.
Airway - If unconscious, gently tip the head back to make sure the tongue is not blocking the airway.
Breathing - Listen for breathing sounds and inform the emergency operator is there isn’t any.
Task 3: Know how to control bleeding by direct pressure on a wound.
When I previously scraped my knee, my mum narrates to me what she was doing which I can totally relate during this first aid course. In order to control bleeding, we first have to apply direct pressure on the cut or wound with a clean cloth, tissue, or piece of gauze until bleeding stops. If blood soaks through the material, it’s important to know not to remove it but instead put more cloth or gauze on top of it and continue to apply pressure. If the wound is on the arm or leg, raise limb above the heart, if possible, to help slow bleeding.
Task 4: Know the importance of cleanliness and show how to dress minor cuts and grazes with a gauze and a roller bandage; apply and remove adhesive dressings.
It is important to keep minor cuts and grazes clean to prevent infection. Recently, I fell down when I trip over a tree branch and there was a cut and visible blood at the side of my forehead. I applied direct pressure with a piece of tissue to stop the bleeding and clean it with antiseptic after before applying adhesive plaster.
Task 5: Demonstrate the use of triangular bandage as an arm sling, knee and head bandage.

During the first aid course, we learned how to use the triangular bandage as an arm sling, knee and head bandage.
Do you know our scout scarf can also be used as a triangular bandage if there are not available triangular bandage on site?
This is a fellow scout practicing the arm sling on me. On returning home, I practice the arm sling using my scout scarf.
These are the steps to use the triangular bandage as an arm sling.
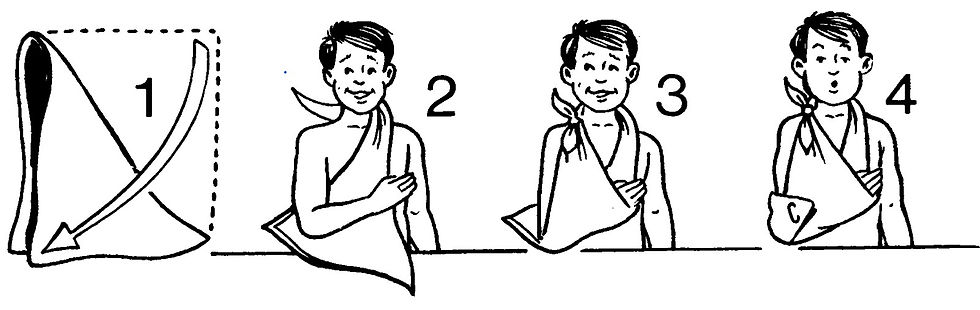
Insert the material under the injured arm so that the arm is in the middle.
Make sure the apex of the sling is beyond the elbow, and the top corner of the material is over the shoulder of the injured side.
Position the forearm so that the hand is slightly higher than the elbow (about a 10-degree angle).
Bring the lower portion of the material over the injured arm so that the bottom corner goes over the shoulder of the uninjured side.
Bring the top corner behind the casualty's neck.
Tie the two corners together so that the knot will not slip.
The knot should fit into the side of the neck on the uninjured side
These are the steps to use the triangular bandage for the knee

First, fold the triangular bandage with cravats. It is quite similar to wearing our scarf.
This is how it should be folded.
Next, bring the ends across extending both downwards. Take both ends and tie it with a square knot at the side of the knee.

Task 6 : Know how to treat burns and scalds and how to put out burning clothing.
Do you know that we are not to t apply toothpaste, lotion, ointment or fatty substance to burns or scalds as per what most of us do? This could irritate the affected area and worsen the situation. Remember not to cover the affected area with cotton wool or break any blisters or remove anything that is sticking to a burn.
This is the four Cs to treat burns and scalds.

If you clothes are on fire, do not panic and remember to do the following or guide the casualty in doing the Stop, Drop, Roll.

Task 7 : Know how to treat a wasp or bee sting and how to remove a splinter
Remove the sting by sliding or scraping your fingernail across it and don't pull at it. Wash the area and apply ice to reduce the swelling. Check if the person has an allergy to bee stings as they can fall into a life-threatening state of anaphylactic shock. Seek help if they are allergic to bee stings else apply antihistamine cream.
We can remove a splinter with a tweezer, Disinfect the tweezers with rubbing alcohol, pinch the end of the splinter between the tweezer’s arms and pulling the splinter out gently and slowly.
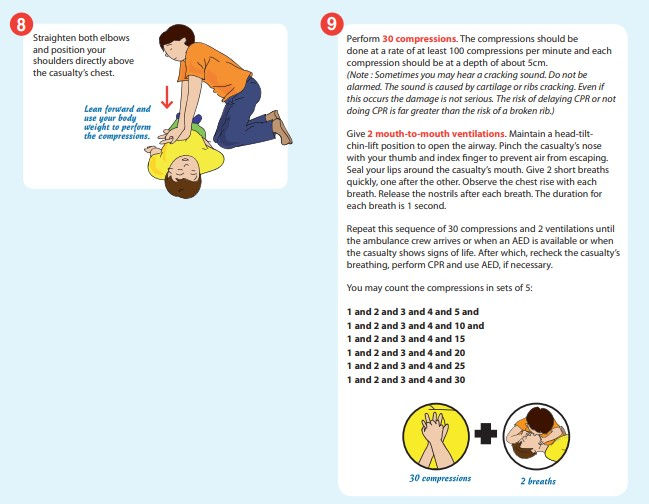
Task 8 : Have knowledge of cardiopulmonary resuscitation (CPR) and where possible demonstrate this method by use of a mannequin or other approved aid
This is the best part of the First Aid course which is to learn CPR. We get to practice on a mannequin and practice the compression counts. There is a total of 9 steps. Always check if the casualty is responsive.


Task 9 : Demonstrate how to make a patient comfortable
It is important to make a patient comfortable. We learn that if a patient is comfortable, they tend to recover better. Cover them with a warm blanket, comfort them, and try to keep them calm.
Know what number to call in an emergency. 995 for emergency situation and 1777 for non-emergency situation. First aid is a good to know for everyone.


Comments